Exchange Backups (Part 1)
Syncrify allows you to backup individual mailboxes in Microsoft Exchange to a remote machine. Part II of this series talk about restoring mailboxes.
How It Works
- When backup starts, Syncrify will execute the scripts you download from this page.
- These scripts will create one PST file for every user you have on your Exchange server.
- Syncrify will back up these PST files to a remote machine.
- After files are backed up, you can optionally remove the temporary PST files to free up some disk space.
Assumptions
Following assumptions are made for the purpose of this demonstration:
- MS Exchange 2010 is running on 64bit Windows 2008 R2 server
- MS Exchange management shell is installed
- Backups are run using the Administrator account
- Hostname of the machine running Exchange is Win2008
- Temporary PST files are created in C:\ExchangePST folder.
Step 1
Create a share on the server and grant Exchange Trusted Subsystem read/write permission. In this example, we are using a share called ExchangePST that is referring to C:\ExchangePST folder. See the image below.
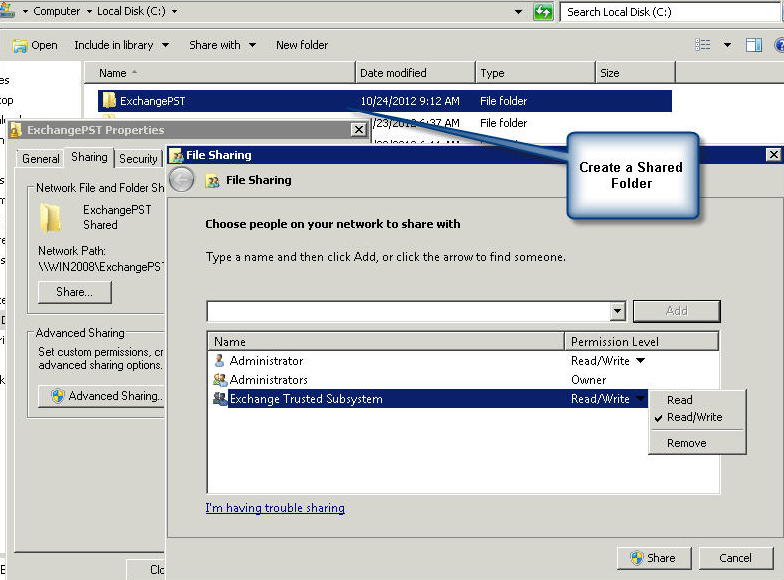
We will be using Microsoft Powershell with Exchange shell extensions to extract mailboxes. Functions in Exchange shell extension expects a UNC style path and therefore, it is important to create this share folder. The value of this shared folder goes in Field 2 below and its actual path will go in Field 3
Once this share is created, you should be able to access this folder using the following path:
\\Win2008\ExchangePSTThis is assuming the machine name is Win2008. You will have to put the actual value of the host name in Field 1 below.
Step 2
Next, you will need to grant a user, or group, the Mailbox Import Export role. Backups will run using this user's account. Follow the steps below to accomplish this task:
- Open Exchange Management Shell on the machine
- Type the following command:
New-ManagementRoleAssignment -Role "Mailbox Import Export" -User YourActiveDirectoryDomain\AdministratorChange the machine and user/group name appropriately in the above command.
- Close Exchange Managment Shell by typing the Exit command.
Step 3
Download necessary scripts by filling out a small form below.
Download necessary the scripts by filling out a small form below.
The downloaded zipped file will contain following files:
- CreateExchangeExport.cmd - Runs Powershell to create PST files. This file is called from Syncrify
- CreateExchangeExport.ps1 - Powershell script
- CleanupExchangeExport.cmd - Optional script that is used to delete the temporary PST files
- RestoreExchange.cmd - Used for restoring mailboxes. See Part II for details.
- RestoreExchange.ps1 - Used for restoring mailboxes. See Part II for details.
- ReadMe.txt - ReadMe text file
Step 4
Ensure you save these scripts in the folder you specified in Field 5 above. Since these scripts are downloaded from the Internet, the OS won't let you run unless you unblock them.
- Right click on the .CMD and .PS1 files you downloaded, and select Properties from the popup menu
- Click the Unblock button. See the image below:

Once you have completed steps 1, 2 and 3 and have unblocked the scripts, you can double click the CreateExchangeExport.cmd file to see if it works. This command should create PST files for every user in your Exchange server to C:\ExchangePST.
If you are not able to create PST files, ensure you have successfully completed step 1 and 2.
Step 5
Now you are ready to configure Syncrify. VERY IMPORTANT: Ensure you are using build 694 or above of Syncrify client in order for the script to work. Using an older client will cause the backup to hang. The script needs to be modified slightly if you are using an older version. Contact our support department if you wish to use an older version of Syncrify client with these scripts.
- Create a new profile if necessary.
- Add C:\ExchangePST as a top level folder
- Add a Pre-Script and specify CreateExchangeExport.cmd for the script.
- Optionally, add a Post-Script and specify CleanupExchangeExport.cmd for the script. This script will remove the temporary PST files that were created during backup.
- Try running a backup manually
Step 6
In Step 2 you have to assign a role to a user on Windows. You must use this user to run your backups. This means:
- Run Backup Monitoring Service using this account if you are using the service-based Syncrify Client.
- Specify this user in Windows Scheduler if you are using the Integrated client.
The Powershell script will fail if it is run by any other user.
Continue reading Part II, which talks about restoring Exchange mailboxes from PST files.