Introduction
There are many third-party
tools on the market for developing client applications and performing query
and reporting against Informix databases. In this article we will discuss
how to enable third-party tools to access Informix databases through ODBC
by installing and configuring Informix-CLI. Although CLI is the client
connectivity tool for both a UNIX client and a Windows client, we will
only discuss setting up ODBC for Microsoft Windows environments.
Application development tools
like PowerBuilder and Visual Basic enable a developer to create client
applications to access RDBMS databases. Products like BrioQuery give the
user a front-end tool to report on their data located on a database server.
You may even have a need to use Microsoft Access database to link to an
Informix database.
The connection from a Windows
client to an Informix database server is achieved by utilizing the Microsoft
Open Database Connectivity (ODBC) standard. ODBC is an API specification
that enables access to multiple DBMS's using SQL. ODBC enforces a standard
that gives client applications interoperability across database platforms.
An ODBC enabled application gains access to a database through the use of an ODBC driver. Each DBMS requires a different driver. The Informix ODBC drivers are bundled in a suite of client connectivity products.
Informix Products
Informix provides a suite
of connectivity products that are used to enable Microsoft Windows' clients
to access Informix servers. The two main products are Informix-CLI and
Informix Connect. In the past, each of these products was shipped as a
separate installation CD. As of this year, these products are bundled together
on one installation CD called Informix Client Software Developers Kit
for Microsoft Windows Environments, or Informix Client SDK.
The
Client SDK contains much more than CLI and Connect. It includes programmer
API's for C++, ESQL/C and Java. It also contains the latest Informix ODBC
drivers and two versions of the ODBC Driver Manager. The remainder of this
article will focus on installing Informix-CLI and the related components,
and configuring the Windows client to use the latest ODBC driver to connect
to an Informix database server.
There are several options
to choose from when installing SDK. Early in the installation process,
there is a choice of "Typical", "Compact" or "Custom" install. If you choose
"Custom" you can see all of the components of the SDK. A "Typical" install
will provide the components necessary to establish an ODBC setup.
Following is a brief description
of some of the key products from the installation CD:
Informix-CLI is the
Informix implementation of the Microsoft ODBC standard. Informix-CLI is
a call level interface, or connectivity tool that enables applications
to dynamically access Informix database servers. CLI is composed of API
libraries, a version of the driver manager and a version of the ODBC driver.
CLI version 2.8 is delivered in Informix-Client SDK version 2.01 and contains
an ODBC driver (version 2.8) for Informix.
The Microsoft ODBC Driver
Manager (or ODBC DM) is used for configuring an ODBC data source (more
discussion about the ODBC data source later). The driver manager is also
known as the data source administrator and can be found in the Windows
control panel. The Driver Manager may already be installed on the client
by another product. There are 2 versions in the component install list
on the Client SDK installation CD. Driver Manager version 2.5 and version
3.0. Refer to the Informix Client Products Installation Guide for Microsoft
Windows Environments for more details on ODBC driver manager.
The Intersolv ODBC Driver
is another component bundled in the Client SDK. The Informix ODBC driver,
version 2.8, is automatically installed with Informix CLI version 2.8.
The more recent driver, the Intersolv Data Direct ODBC driver version 3.01,
is a separate component in the list of options in the SDK install. If you
use the version installed with CLI (version 2.8), it is recommended that
you use version 2.5 of the ODBC DM. ODBC DM version 3.0 is required if
you use the Intersolv Data Direct ODBC driver.
Informix Connect is
composed of the runtime versions of the connectivity components. Connect
comes bundled with most of the Informix Windows client products. This product
is useful because it can be deployed on client machines to enable completed
applications to connect to Informix databases in the Windows environment.
Once you have installed the
products on the Windows client, you must configure the products using the
proper server and database information.
Component Configuration
The first configuration step
is to create a server entry on the Windows client machine, and provide
values for the Informix variables. Informix includes a utility in the connectivity
products called "Setnet32". Its function is to provide the Windows client
with the information it needs to connect to the server by defining the
database server, host machine, network protocol and user account information.
Setnet32 saves these entries in the Windows registry. A helpful feature
of this utility is the ability to save the configuration to a file and
conversely load it from a file. If there are several clients to configure
with the same server information, an initial machine can be configured
manually, the configuration saved to a file and loaded on other client
machines.
To use Setnet32 on the Windows
client, click on Start, Programs, the Informix program group installed
with SDK, then Setnet32. The first screen that is displayed shows a list
of environment variables. Some of the environment variables are required
and some are optional. The majority of the environment variables on the
client are used for CLI function calls and GLS programming. We will focus
on two variables used to establish client/server connectivity.
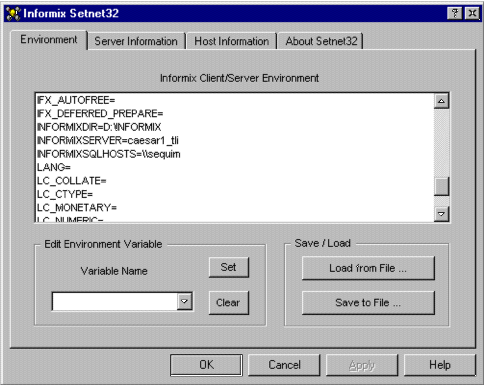
The
Environment tab of Setnet32
In the environment screen,
scroll down through the list toward the bottom and check the settings for
INFORMIXDIR and INFORMIXSERVER. The INFORMIXDIR variable is automatically
set with the directory value specified during the software setup and installation.
The INFORMIXSERVER variable can be set manually, or it will automatically
be set as a result of entering values in the Server Information tab.
In the Server Information
tab, define an entry for the server.
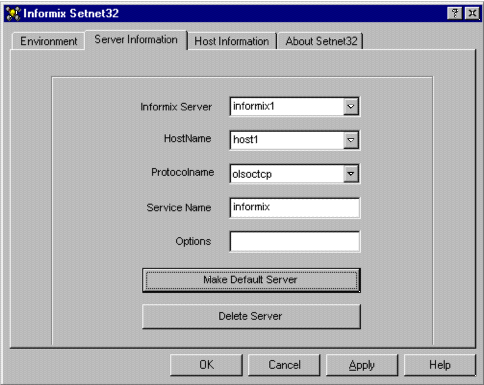
The
Server Information tab of Setnet32
Informix Server - the Informix database server/instance name.
HostName - the name of the host machine where the database server resides.
Protocolname - the network communication protocol.
Service Name - the service name in the services file that corresponds to the listening port.
Options - this is
used for defining groups.
After the information has
been entered, click on "Make Default Server" and the INFORMIXSERVER variable
in the Environment tab will be set with the value from the from "Informix
Server" field. Click on the "Apply" button to create the entry and click
on "OK" when finished. Define as many servers as needed.
If you are familiar with
setting up Informix Dynamic Server for UNIX, you may find these entries
are identical to the information entered in the sqlhosts file. This information
is saved in the Windows registry under a key value - SQLHOSTS. As a result,
there is no need to have a sqlhosts file
on the Windows machine. Rather, the INFORMIXSQLHOSTS variable in the Environment
tab contains the name of the client machine name where the registry entries
reside.
ODBC Data Source
A Data Source consists of
an ODBC driver, a database and the server information. The server information
is the same information defined previously in Setnet32. A Data Source is
created using the ODBC Driver Manager or ODBC Data Source Administrator
as discussed previously. The ODBC Data Source Administrator is started
in Windows by clicking on Start, Settings, Control Panel, and ODBC.
In the initial screen, click
on the "Add" button to create a new data source. A list is displayed showing
all of the ODBC drivers installed on the Windows client. From this list
you can see the version numbers and actual file names of the drivers.
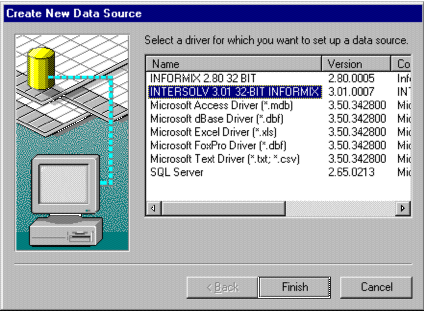
Selecting
the ODBC driver during data source creation
To reiterate what was previously
mentioned, the first Informix ODBC driver in the list above, version 2.80,
is automatically installed with the CLI components. The second Informix
driver, version 3.01, is a separate component in the list of options in
the SDK install. There are different characteristics associated with each
driver concerning the actual ODBC data source set up. The example below
illustrates creating an ODBC data source using the version 3.01 driver.
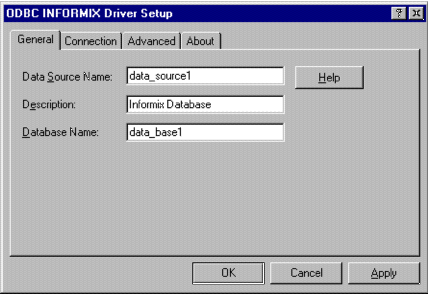
"General" tab: Entering the name, description, and database
during
data source creation
In
the General tab, enter the data source name, description and database name.
The key here is specifying the exact database name that you are connecting
to.

"Connection"
tab: The host, service, server and protocol are filled
in from the "default server" specification in Setnet32
In the Connection tab, the
default server information is automatically filled in from the server creation
in the Setnet32 utility. If this particular data source needs to connect
to a server other than the default, simply specify the values here. Once
the information is entered in the "General" and "Connection" tabs, click
on "OK" and the ODBC data source is complete.
Services
File
The
final configuration item is adding an entry to the services file on the
client machine. This is identical to the /etc/services file in the UNIX
environment. The entry consists of the service name, listening port number
and protocol. On the client, the service name must match the service name
specified from the server entry created in Setnet32. The listening port
number must match the number specified on for the server. The protocol
for a tcp/ip network will be "tcp".
The services file for the
Windows client is located in the windows home directory. However, the specific
location depends on the operating system. For Windows 95, the file is c:\windows\services.
For Windows NT, c:\winnt\system32\drivers\etc\services. Use an ASCII editor
(Notepad) to open the file and insert a line to identify the service. The
format of the service entry is documented at the top of the file.
An example of a services
file entry is:
informix1 1526/tcp #Informix
server
Make sure there is a carriage
return at the end of the line.
Testing
the connection
After
the server is defined to the client and the services file entry has been
created, the client to server connection needs to be tested. The ILogin
program is provided as part of the product install to help verify that
all of the information is correct for the client to connect to the server.
Execute the utility on the Windows client by clicking on the Start, Programs,
the Informix program group installed with SDK, then "ILogin Demo". Enter
a valid user-id and password, and ILogin will automatically attempt to
connect to the default server and run a query against the customer table
of the stores7 database. This is a useful tool for trouble shooting the
client to server connection.
The database connection defined
in the data source needs to be verified using an ODBC-enabled application.
The application references the data source by the Data Source Name (DSN).
Refer to the product documentation for referencing a DSN. Your connectivity
setup is complete once you have established the connection from the application
software to the database.
Summary
The first several times I
attempted to configure a client with Setnet32 and ODBC, I would experience
a different error. However, by reading documentation, consulting with others,
and through trial and error, I was able to get to the point where I could
accomplish the process without any problems. I've included some of the
"gotchas" that I experienced.
2. Informix error -908. Verify the listening port number defined on the server matches the client.
4. Informix error -931. Verify the service file entry matches the service name in the Setnet32 Server Information tab.
6. Informix errors -951 and -956. These errors indicate the user and/or the host machine does not trust the client machine. The client machine name may need to be added to the /etc/hosts.equiv and/or the .rhost file in the user's UNIX home directory on the server machine.
8.
You may experience this error during the ODBC setup in the ODBC Data Source
Administrator:
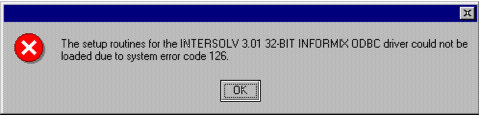
The solution to this problem
is to explicitly set the INFORMIXDIR and PATH environment variables in
the Environment tab under System Properties in the Control Panel. Create
the INFORMIXDIR variable and supply the value of the directory where Informix
CLI is installed on the client. Add the Informix home directory path plus
the "\bin" to the beginning of the PATH variable. Set these in the System
Variables section.
Setting up the client server
connectivity may involve more in depth troubleshooting and analysis. Be
prepared to allow time for these activities.
Documentation references.
It
is very important to reference the documentation materials that come with
the product. In addition to reading the release notes, there are several
manuals that address the steps covered in this article.
2. Informix Client Products Installation Guide for Microsoft Windows Environments, Version 2.0. This describes how to install and configure the client products addressed in this article.
4. INFORMIX-CLI Programmer's Manual, Version 2.8. This manual is helpful with configuration as well as the deeper workings of CLI.
6. INTERSOLV
DataDirect ODBC Driver User Guide for Informix Database Servers, Version
3.01. This is an excellent resource for referencing the items covered
in this article pertaining to the ODBC driver and Driver Manager.
James
Edmiston is President of Quest Information Systems, Inc. and an Informix
Certified Professional. He serves as Treasurer and Membership Director
of the Washington Area Informix Users Group. Visit his company web site
at www.questisinc.com or
email him at James@QuestISInc.com.